
Main Courses
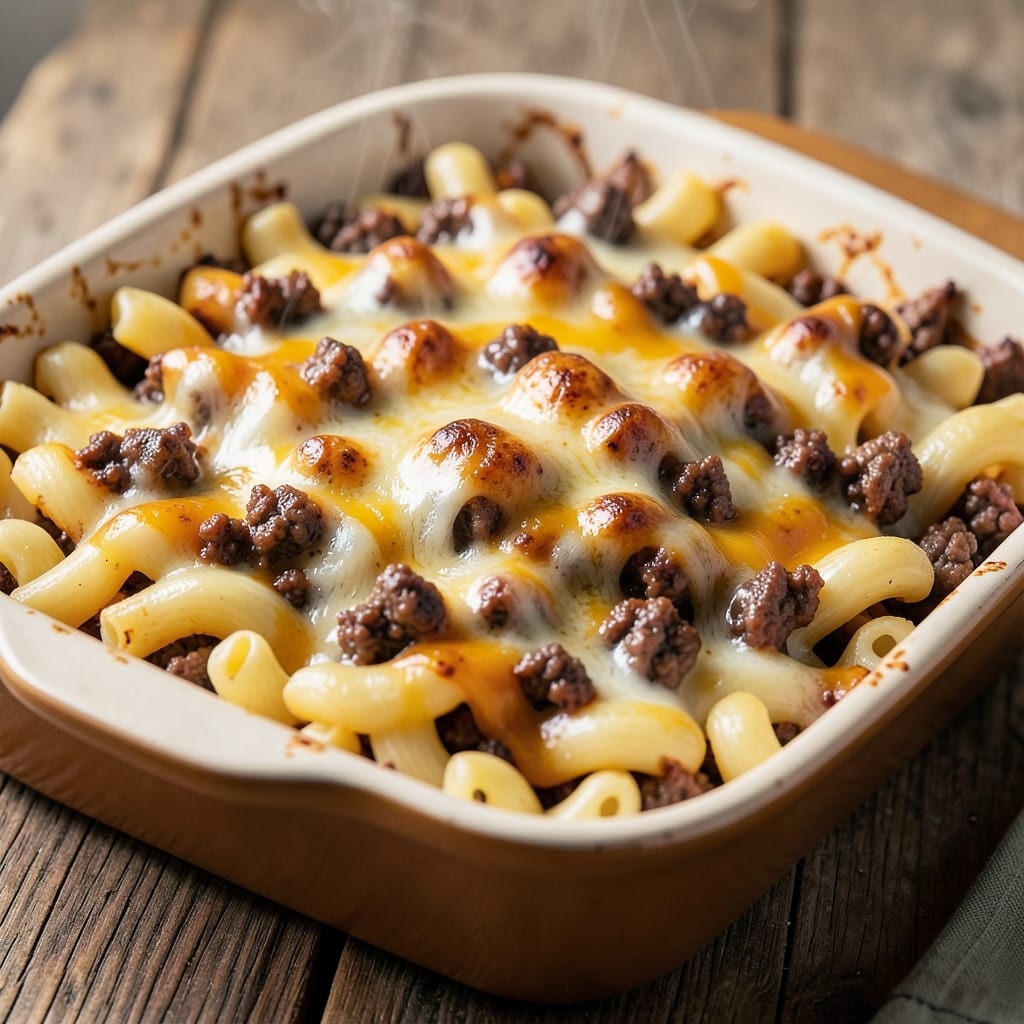
This baked mac and cheese with ground beef recipe transforms a classic comfort dish into a hearty, protein-packed meal that's impossible to resist. The rich, creamy cheese sauce gets elevated by tender, seasoned ground beef that adds depth and satisfaction in every bite. I've perfected this one-bake wonder to deliver crispy edges, melt-in-your-mouth cheese, and perfectly cooked pasta—all while keeping the process straightforward.
The secret lies in properly browning the beef first to develop rich flavors, then building the cheese sauce with a roux that prevents separation. Layering the mixture creates that signature baked mac and cheese texture while ensuring the beef stays juicy and flavorful throughout. This dish is ideal for feeding a crowd or meal prepping for the week ahead.
By the time it emerges from the oven, you'll have golden, bubbling mac and cheese with a crispy breadcrumb topping and tender beef woven throughout. The combination of creamy cheese, savory beef, and crispy edges creates a dish that's both indulgent and satisfying—perfect for family dinners or casual gatherings. The best part? It all comes together in one baking dish with minimal cleanup.
Whether you're serving it as a main course or a side dish, this baked mac and cheese with ground beef delivers restaurant-quality results at home. The beef adds a hearty element that makes it feel like a complete meal, while the cheese sauce ensures every bite is rich and comforting. Ready to make this cheesy, beefy masterpiece?
Ingredients for baked mac and cheese with ground beef
Six servings of cheesy beef goodness—all in one baking dish. Pantry staples plus a few key ingredients for restaurant-quality comfort food.
| Ingredient | Amount | Notes |
|---|---|---|
| Elbow Macaroni 🍝 | 1 ½ lbs | Medium or small shape preferred |
| Ground Beef 🥩 | 1 ½ lbs | 80/20 fat ratio for juiciness |
| Sharp Cheddar Cheese 🧀 | 3 cups | Shredded, block preferred |
| Heavy Cream 🥛 | 1 cup | Full-fat for creaminess |
| Whole Milk 🥛 | 1 cup | 2% works too |
| Butter 🧈 | ½ cup | Unsalted, softened |
| All-Purpose Flour 🌾 | ¼ cup | For roux |
| Yellow Onion 🧅 | 1 whole | Diced, medium size |
| Garlic Cloves 🧄 | 4 cloves | Minced, fresh preferred |
| Panko Breadcrumbs 🍞 | ½ cup | For crispy topping |
| Salt 🧂 | 1 ½ tsp | Kosher or sea salt |
| Black Pepper 🌶️ | ½ tsp | Freshly ground |
| Worcestershire Sauce 🍶 | 1 tbsp | For beef seasoning |
| Dried Mustard 🌶️ | ½ tsp | For depth of flavor |
The beef is where the magic happens. 80/20 fat ratio keeps it juicy while browning—don't drain the fat, leave it in for flavor. I grab mine from Costco in bulk, but the regular supermarket stuff works too. Freshly minced garlic (not jarred) adds the most punch, but if you're in a rush, jarred works in a pinch. For the cheese, block cheddar shreds better than pre-shredded—no clumps, no beading. The macaroni? Medium or small elbow shapes hold up best to baking without getting mushy.
No panko? Regular breadcrumbs toasted in butter work just fine—they'll still get crispy. Short on Worcestershire? Extra soy sauce plus a pinch of sugar mimics the umami. The dried mustard might seem odd, but it adds that subtle tang that makes the whole dish sing. Substitute with a pinch of Dijon if you've got it. For the roux, don't rush it—cook the flour and butter until it's golden brown for that nutty depth. And if you're watching calories, use half-and-half instead of heavy cream—it cuts the fat but keeps the creaminess.
This reheats beautifully—honestly tastes better the next day once everything melds. Keeps 4-5 days in the fridge, freezes for 3 months. I portion mine into containers so lunches are sorted for the week. For the crispy topping, toast the breadcrumbs in butter before sprinkling—it makes all the difference. And save the leftover cheese rind! Toss it in the pot while heating for extra flavor.
Why You'll Love This Recipe
- One-Pot Magic: I swear by this recipe because it’s literally one pan—no boiling pots to juggle, no sticky stovetop mess. The ground beef browns right in the same dish as the pasta, and by the time the cheese melts into that golden crust, my kitchen’s already spotless. (Yes, even on a Tuesday night.)
- Cheesy Meat Hug: That sharp cheddar and heavy cream combo? It’s like a warm, salty embrace, but the ground beef adds this meaty depth that turns it from comfort food to full-blown craving. The first bite is always a “wait, is this too good?” moment.
- Leftovers That Don’t Suck: Honestly, this dish begs to be made extra. The baked version reheats beautifully—crispy top intact, no soggy pasta—so I portion it out for lunches all week. My kids actually ask for it, and that’s saying something.
- Budget Win: Ground beef stretches further than chicken, and elbow mac is cheaper than fancier pasta. Add in milk and a block of cheddar? This feeds four for under $10, and the leftovers stretch it even longer. My wallet and my family thank me.
Step-by-step instructions for baked mac and cheese with ground beef
Here's how to build layers of cheesy, savory goodness in one simple bake.
Cook the Elbow Macaroni to Al Dente Perfection
Bring a large pot of water to a rolling boil and add 1.5 lbs elbow macaroni. Stir immediately to prevent sticking, then add 1.5 tsp salt and cook until 1 minute before the package directions for al dente. You want the pasta slightly firm—it'll finish cooking in the oven.
Drain the pasta in a colander, then rinse briefly under cold water to stop the cooking process. Shake off any excess water and return the drained pasta to the pot. Toss with 1 tbsp Worcestershire sauce and 0.5 tsp dried mustard to infuse flavor while it cools slightly. This step ensures your pasta absorbs the rich cheese sauce rather than turning mushy.
Brown the Ground Beef and Sauté Aromatics
In a large skillet over medium-high heat, crumble 1.5 lbs ground beef and cook until browned, breaking it into small pieces with a wooden spoon. Drain any excess fat, leaving about 1 tablespoon in the pan for flavor.
Add the diced yellow onion and minced garlic cloves to the skillet, cooking for 3-4 minutes until softened and fragrant. The onions should turn translucent while the garlic releases its aromatic oils. Season with 0.5 tsp black pepper and set the beef mixture aside—it'll add hearty depth to your mac and cheese.
Create the Creamy Cheese Sauce
In the same skillet, melt 0.5 cup butter over medium heat until foaming. Whisk in 0.25 cup all-purpose flour to form a roux, cooking for 1-2 minutes until golden and bubbly. This creates the foundation for your velvety sauce.
Gradually whisk in 1 cup heavy cream and 1 cup whole milk, stirring constantly until the mixture thickens to a smooth consistency. Reduce heat to low and add 3 cups shredded sharp cheddar cheese, stirring until fully melted and creamy. The sauce should coat the back of a spoon—if it's too thick, add a splash of milk to reach your desired texture.
Assemble and Bake the Mac and Cheese
Preheat your oven to 375°F and grease a 9x13-inch baking dish. Spread half of the cooked macaroni evenly across the bottom, then top with half of the beef mixture and half of the cheese sauce. Repeat with the remaining pasta, beef, and sauce, ending with the sauce on top.
Sprinkle 0.5 cup panko breadcrumbs evenly over the top for a crispy finish. Bake uncovered for 25-30 minutes until the top is golden brown and bubbly. The edges should be slightly crispy while the center remains creamy—this is your perfect texture balance.
Rest and Serve with Confidence
Remove from the oven and let the mac and cheese rest for 5-10 minutes before serving. This resting time allows the layers to set slightly, making it easier to slice and serve without losing any cheese sauce.
Cut into squares and serve immediately while still warm. Each bite delivers tender pasta, savory beef, and rich, melty cheese all in one perfect package. The crispy breadcrumb topping adds a delightful contrast to the creamy interior—this is comfort food at its finest.
Pro Tips For Making Baked Mac And Cheese With Ground Beef
- COOK THE PASTA AL DENTE: I used to overcook the elbows just to get them done faster, but that turns the baked mac into a sad, mushy mess. Pull them out when they’re still firm—about 1 minute less than the package says—and they’ll hold up perfectly when baked.
- BROWN THE BEEF FIRST: Skipping this step means you’re missing out on flavor and texture. Cook the ground beef until it’s fully browned and crispy in spots—no gray left—then drain the fat. That extra effort makes the whole dish richer, not greasier.
- MELT THE CHEESE LOW AND SLOW: I learned this the hard way—dumping shredded cheddar into hot cream makes it clump like rubber. Warm the milk and cream together first, then slowly whisk in the cheese until it’s fully melted. No lumps, just smooth, velvety goodness.
- USE A MIX OF MILK AND CREAM: Heavy cream alone makes the sauce too rich, but whole milk alone feels watery. Split the difference—use half and half—and the texture stays creamy without being heavy. Trust me, your taste buds will notice.
Dietary considerations for these flavors
Gluten-Free Adaptation
Swap the elbow macaroni for gluten-free pasta like Barilla GF or Jovial. Use a 1:1 ratio by weight to maintain texture. For the breadcrumb topping, replace panko with crushed gluten-free cornflakes or almond flour mixed with oil to bind. The cheese sauce stays the same, but ensure your flour is gluten-free—Bob's Red Mill 1:1 works perfectly. 🌾
Dairy-Free Options
Replace the sharp cheddar with nutritional yeast (for cheesy flavor) and dairy-free cheeses like Violife or Daiya. Use full-fat coconut milk instead of heavy cream and milk, and olive oil in place of butter for the roux. The Worcestershire sauce is dairy-free, but check labels—Annie's is a safe bet. The texture will be slightly lighter but still creamy.
Lower-Carb Version
Cut carbs by using cauliflower rice instead of pasta (sauté with garlic and onion first). Replace the cheese with Parmigiano-Reggiano (lower in carbs than cheddar) and add hemp seeds for protein. The beef remains the same, but reduce the sauce by half to balance the dish. Top with crushed pork rinds instead of panko for a crispy, carb-free finish. 🥦
Vegetarian Swap
Skip the ground beef and add sautéed mushrooms and crumbled tempeh for texture. Boost umami with 1 tbsp soy sauce and 1 tsp smoked paprika in the sauce. Use extra sharp cheddar or Pepper Jack for a bolder flavor. The dish stays hearty but becomes plant-based without sacrificing richness.
Protein Boost
Add ½ cup cooked black beans or diced roasted potatoes to the beef layer for extra fiber and texture. For a higher-protein cheese sauce, stir in 1 cup Greek yogurt (full-fat) instead of heavy cream. The dish becomes even more satisfying while keeping the same creamy, cheesy profile. 💪
Nutrition facts
Frequently asked questions
Can I use ground turkey instead of beef?
Ground turkey works beautifully and keeps the dish lighter. Use a 93/7 lean-to-medium ratio to maintain moisture, and add 1 extra tablespoon of oil to the pan while browning to prevent drying. The flavor will be slightly milder, so boost it with extra Worcestershire sauce (2 tbsp total) and a pinch of smoked paprika.
Why did my cheese sauce separate?
Separation usually happens when the sauce cools too quickly or isn't stirred properly. Always keep the sauce on low heat while melting the cheese, and stir constantly until smooth. If it separates, whisk in 1 tablespoon of cold milk or cream and 1 teaspoon of flour to rebind. For next time, try adding the cheese gradually and removing the pan from heat just before it fully melts.
How do I make this dish ahead of time?
This mac and cheese actually tastes better the next day! Assemble the dish up to 24 hours ahead and refrigerate uncovered. When ready to bake, cover tightly with foil and bake at 375°F for 30-40 minutes (add 5-10 minutes if fully chilled). For freezing, bake completely, cool, then wrap tightly in plastic wrap and foil—it keeps for 3 months. Reheat covered at 350°F for 20-25 minutes.
What's the best way to reheat leftovers?
For best results, cover the dish with foil and reheat at 350°F for 15-20 minutes until warmed through. If using the microwave, cover with a damp paper towel and heat in 30-second intervals, stirring between each. Add a splash of milk or cream if the cheese looks dry. For extra crispiness, broil for 2-3 minutes at the end with the foil removed.
Can I add other vegetables?
Yes! Finely diced bell peppers, zucchini, or even roasted potatoes work well. Sauté them with the onions and garlic until tender before mixing with the beef. For heartier veggies like broccoli or cauliflower, add them to the baking dish during the final 10 minutes of baking. Just be mindful of moisture—don't overdo it or the breadcrumb topping may stay soggy.